The Basics
What to Expect in this Guide
This Basic Guide is the starting point for learning to use our platform: It will lead you through the main steps of text generation. You will learn how to create projects, import and analyze data, write statements and generate text.
On this page, you will get an introduction to the topic and you can immediately practice each step that you have learned on the platform. At the end of the seminar, you will have a first project, based on smartphone data with automatically generated text.
Requirements: For this Basic Guide you don't need any previous knowledge.
Text Projects in Sequence
A text generation project can be divided into individual segments, each of which focuses on a certain task. The tasks in these segments build on each other so that they are usually completed one after the other. In practice, however, the tasks are sometimes interlocked, for instance, you can switch back to analyze your data after writing some statements.
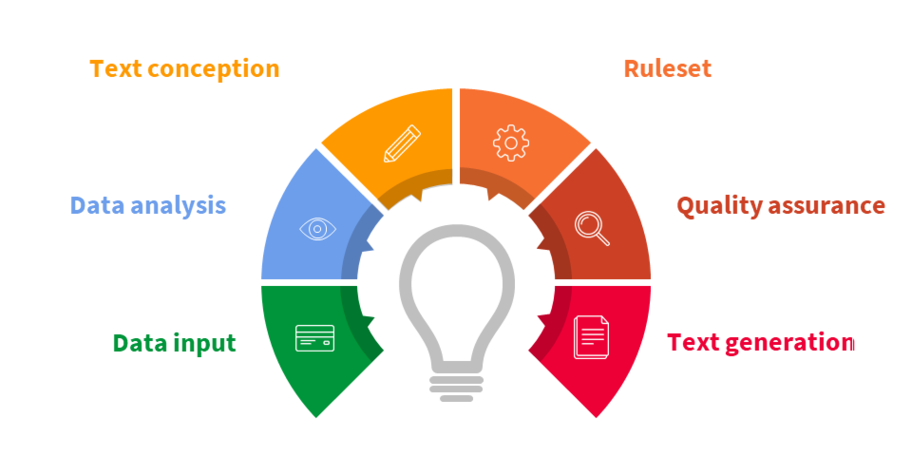
Data input : Text generation is based on structured data. The software can only write about things that can be derived from your data. So the first step is to upload your data.
Data analysis: Take a look at the data and check what information you can extract from it.
Text conception: You decide what information the text should have, how this information should be formulated and how your text should be structured.
Ruleset: In the ruleset, you can access your data and create logical evaluations about it. You can also define which words should be used for the outcomes of these evaluations.
Quality assurance: After you finish the configuration of the project, you then perform a quality assurance step, where you check the project and its results for correctness.
Text generation: Now you are ready to generate your own automated text.
Start a Text Generation Project and Import Data
On the NLG Platform, the organizational unit is called the "Project". A Project contains everything you need to generate text:
- The data that you import.
- The ruleset you develop for your texts.
- Your statements, e.g. the part of the text you write.
Assess and Prepare Data for the NLG Platform
The Requirements
Data is a basic prerequisite for text generation on the NLG platform. It provides the essential input for the content of your text. In order to get meaningful and useful text, the data you use should comply with a few conditions.
The Structured Format of the Data
Data must be provided in a structured format. This means that data should be provided in separate data fields, e.g. you cannot use continuous text as a data source. Tables, as in Microsoft Excel are fine, but for more complex data structures, the JSON data format is also supported.
Example:
| brand | operating_system | category | processor_cores | dimensions_HxWxD_cm |
|---|---|---|---|---|
| Samsung | Android | smartphone | quad core | 15,3x7,9x0,9 |
| Apple | iOS | smartphone | quad core | 15,3x7,9x0,9 |
| Huawei | Android | smartphone | quad core | 15,7x7,9x0,9 |
The Quality Criteria for the Data
Structure by itself is not sufficient – data must also meet certain quality requirements:
Technical quality criteria require uniform filling (all datasets express the same fact identically: “black” always has to be “black”) and the ability to be processed by a machine. Data can be machine-processed if, for example, lists are clearly separated, the same units are always used, or words are always present in the same grammatical form.
Editorial quality criteria are, for example, the correct spelling of the content, the significance of the data fields (a field that always has the same value is textually less relevant than a field that has many values), or whether sufficient data records actually have data in the field so that writing a text is worthwhile.
Start your text generation project
- Create the project and the collection that you will work with in this tutorial.
- Learn how to upload data to your collection.
- Take a look at a document stored in JSON format.
From Data to Nodes
The data you have uploaded has to be analyzed and prepared to be used in your text. This is done by defining which fields will be used as variables, and as what kind of values. On the NLG Platform, this procedure is called "adding data nodes". The created data nodes are then available for further processing in other areas of the platform.
To help you decide which fields to use in the text, the software first runs an analysis. Then you choose the categories and create nodes that you can use in the next steps of the text generation.
Take a closer look at your imported data and create the data nodes
- Understand how the software analyzes the data.
- Add some nodes for further use in your project.
Write Statements and Define the Variable Parts
Statements
In the next step, you will design a text concept that describes what kind of information will appear in your text. On the NLG platform, a statement is the content unit in this text concept. For example, a headline or an introduction are statements that can be found in most projects.
- One statement can contain one or more sentences.
- You can define different text outputs for different data values within your statements.
- You can set under which conditions a statement will appear.
Containers
A statement is composed of static parts that you have to formulate and of variable parts that are either transferred directly from your data fields or are derived from them. To define the variable parts in your statements, mark these parts as containers at the correct positions in the statement.
Container Settings
Within the containers, you have several options to specify the variable parts: The outputs of the containers can be simple data values or more complicated things like the content you define in self-created variables. And they offer many possibilities in their configuration. In the container settings, you can manage the content, the formatting, and the grammar of each container.
- In the content settings you determine the associated variables.
- If you name the role of a container within a sentence, the text can be grammatically adapted automatically, when changes are made.
- Set the formatting of a word (e.g. capitalize) to achieve your desired formatting.
Preview Test Object
When writing on the NLG platform, you are not using placeholders, but formulating your statement based on a single real data set: "Samsung presents the smartphone Galaxy Note 4.".
For this purpose, you can configure suitable datasets as Preview Test Objects:
- In the Data Sources click on the star icon in the list of the documents.
- In the Composer you can choose between the designated preview test object or switch to the test objects configuration to see all options.
Switching between different Preview Test Objects is a good method to **review your statements and check how they vary with different documents.
Write a statement and create containers
- Get to know the different elements of the Write Tab.
- Add statements and create containers.
- Adjust the grammatical output.
- Check your possible outputs by changing the Preview Test Object.
Define the Logics and Conditions
In order to output more than just data values, it is possible to define specific conditions for outputs. In the NLG platform, this is done with nodes and connections: The Transform Tab of the Composer provides a graphical environment for facilitating the formulation of conditions.
Nodes - Anatomy and Functions
In the Transform Tab nodes look like small boxes and allow you to modify, evaluate and pass on data. It is possible to connect different nodes via the small yellow and grey plugs, the so-called ports. Use nodes whenever you want to add some individual logic to your project.
The outcomes of all nodes will flow into the corresponding Variable nodes. Variable nodes have only an input port and are the only nodes that can be directly used in the text. In the Write Section, a list of all Variable nodes is provided for further use in the text.
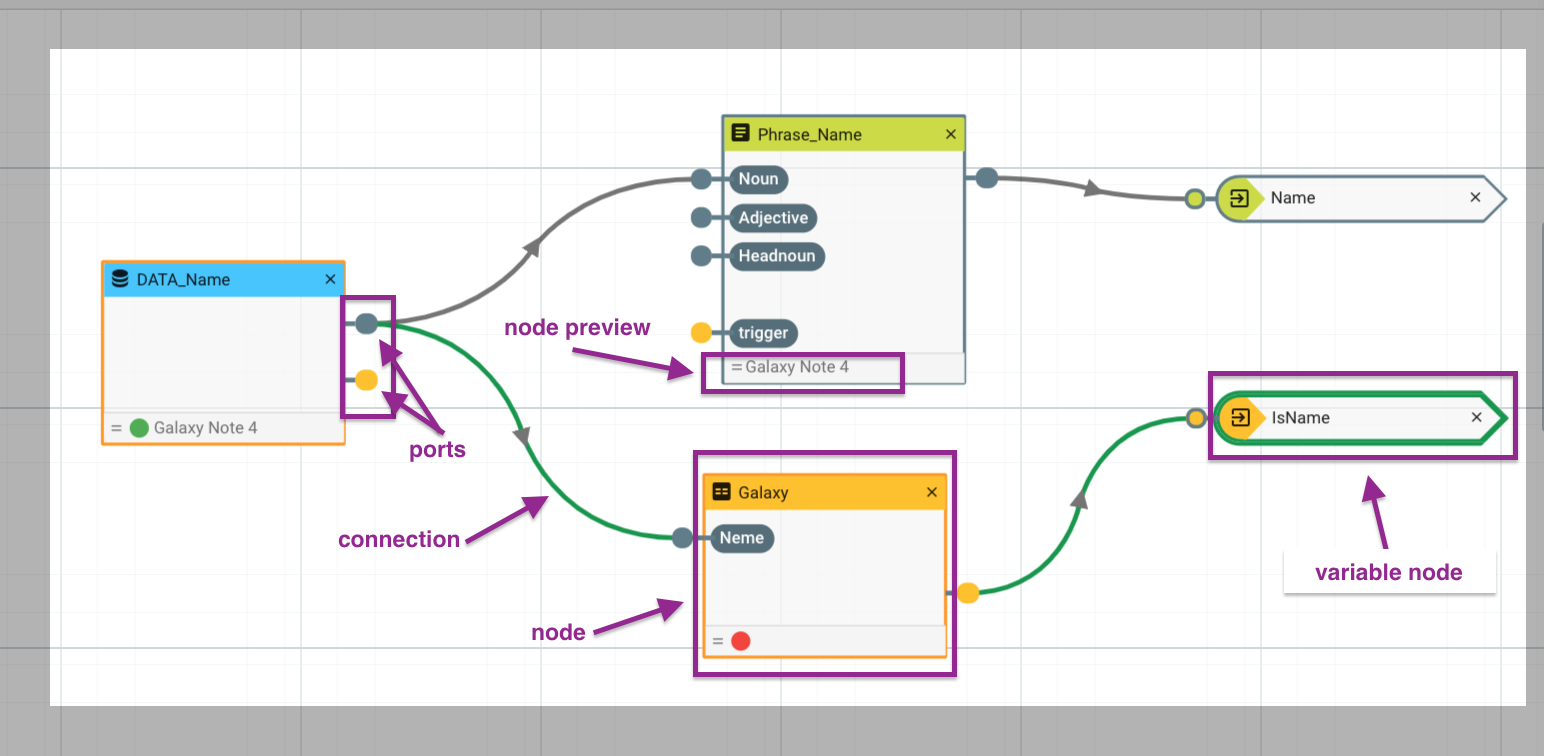
In the preview field at the base of each node, you can see the output of the current test object. Each time you change the test object, the changes will be applied automatically. Similarly to the statement preview, you also have a Node Preview to check whether your conditions are working correctly. The colored indicator (red or green) of the small circles at the lower edge of the nodes indicates whether a condition for the chosen test object is true or false.
Node Types
| Node Types | Description |
| data | Data nodes allow you to process the values in your data fields and to insert the variables in the correct positions in the statements correctly.**. (You can create them in the Analyze tab) |
| mapping | With the mapping nodes you can process your data, by using it for calculations or replacing it with other terms. |
| condition | You can use conditions to create different processing branches that lead to different variable outputs. |
| phrase | The phrase nodes provide the higher level grammatical and semantic instances of the nouns and define the relationship to the corresponding adjectives. |
| variable | Nodes with only an input port. They are the only node types that can be used directly in the text – either to trigger an entire statement or to control the output within a statement. |
Connection Ports
Like data nodes, the other node types have ports to connect to other nodes. To use the content of a node in another node, simply drag from the output port of the first node to the input port of the corresponding node. Note that the colors** of the** ports have to match** to make a connection. There's one exception to this rule of matching colors: variable nodes** have initially a grey port, but if you connect a yellow port e.g. from a condition node, with it, it will change its color to yellow.
| Position / Colour | Function of the Ports |
|---|---|
| Left side ports | input ports for incoming value |
| Right side ports | output ports for results |
| Grey ports | are to pass on content |
| Yellow ports | for a switch function |
Set up conditions and logics
- Get familiar with the layout of the Transform Tab.
- Configure conditions for different field values.
- Process conditions for using them in your text.
- Use branches for creating different outputs.
Branches
When writing a statement, you can branch off at certain points** in your statement. This facilitates creating more than one way of expressing your information or activating different variations of your sentence depending on the data. You can create branches that contain one or more words, phrases, or even entire sentences. The branches appear below each other in the Write section, so you can easily keep track of your construction. For each branch you can set different branching modes to decide which branch to render, so you can easily implement logic while writing your text.
What you can do with branches
- Set synonyms - words, sentence parts or complete sentences for variation in your text.
- Define a proper text output for different data values.
- Manage variants for your statements.
Use Branches to put different statements into words
- Practice working with conditions and triggers.
- Create branches that span single words or parts of sentences.
Compose Your Text
After you have written your statements, you can arrange them. You set the order of their appearance and define under what conditions each statement is triggered or blocked. To create a wider range of different texts, you can also choose to trigger different parts of one statement.
Variable Nodes for Triggering Statements
To switch a statement on or off, you can use a variable node with a condition. This works as a mechanism for activating and deactivating containers, branches, statements, or stories. You define your conditions with a condition node in the Transform Tab and pass on the condition to the Write Tab via a variable node for organizing your statements. When creating your stories in the Narrate Tab you can also set the condition for each story with a variable node.
TIP
When you create a new story, check that the default trigger setting is "off". And then if you want your new story to appear, remember to switch the trigger on.
Manage Your Composition in the Write and Narrate Tabs
In the Write Tab, you organize your statements, name them, and set their styles and when their conditions are to appear. When you switch to the Narrate Tab, you can put your story together and determine its course by controlling the order of the statements in your text. To increase the variety of the text, you can create several stories and vary the order of the statements. In addition, you can assign triggers to the stories that determine the condition under which a story should be used.
Organize your statements and put them into different stories
- Activate and deactivate statements under certain conditions.
- Name your statements and add the associated variable nodes.
- Create different stories.
Review and Generate the Texts
To control the quality of the generating text, it is recommended to check your outcome under different conditions and documents. In the Review Tab you can look at your data sets and possible produced text and look for spelling or content mistakes or logic errors. In this view, you can also find out, how the statements work together.
The actual generation is the final step in your text project. Depending on your use case and the stage of your project, you might want to produce different amounts and subsets of your texts. Therefore, we allow different modes of text generation. You can decide whether you would like to start generating single texts or the entire text mass.
| Generation type | Description |
| single | You can produce a text for a single document. This text is going to be produced instantly. |
| all | You can produce texts for all documents in a collection. This will be handled as a bulk operation and might take some time if your collection is big. |
| filtered | You can produce texts for a certain subset of your data. This subset is defined by setting filters. You can filter your collection with search terms or by text production status. Filters are only available inside a collection, and will not work across collections. This is handled as a bulk operation as well. |
| auto generation | In the collection settings, you can configure "auto generation", this will trigger a text production automatically if a new document is added. The automatic regeneration of a text if a document is changed is available as well. |
Export the Generated Text
If you want to handle your text export manually, you can download text exports in the web interface. These files are updated automatically and contain a snapshot of your text production, which can be up to an hour old. The supported file formats are JSON, CSV, and Excel. You can select the format in the settings of every collection. The UID allows you to match the produced text to your database. The exports contain both raw text and HTML.
Review your project and generate one or more texts out of your ruleset
- Perform a quality assurance in the Review Tab.
- Get an overview of the Results Area*.
- Generate your text.
What's Next?
Congrats! You have successfully completed the AX Seminar, now you are no longer a newbie in NLG. It is like learning a new language or getting a driver’s license, to improve your skills, the best thing you can do is to practice.
With the AX Seminar, you have acquired basic knowledge of the principles of text generation and skills to work with the NLG Cloud. Now you are able to take the first steps in your very own project.
Do you have structured data? Ideas for statements? Then start your projectright now!
Do you have any special requirements or any further questions? The AX Semantics support team can assist you quickly via chat on the NLG platform.